|
[
SUPPORT - Motorcycle Brake Maintenance Guide ]
Motorcycle Brake
Maintenance Guide
Motorcycle Brake Maintenance Tips to keep your
motorcycle at peak condition.
Motorcycles accelerate fast and have a high top speed but it is
your brakes that you depend on to stop you when you need it.
Learning to preform your own motorcycle brake maintenance on
your bike will keeps your brakes in top condition.
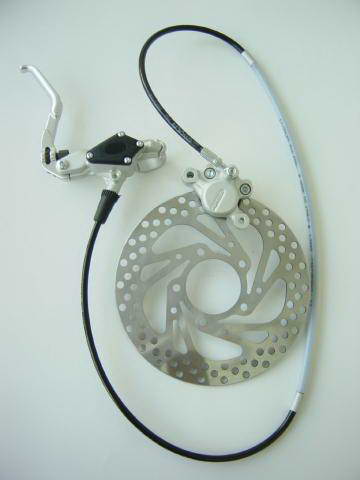 Motorcycle master cylinder, brake line, caliper and disk
brake (rotor).
Motorcycle master cylinder, brake line, caliper and disk
brake (rotor).
Motorcycle Brake Maintenance
Brakes
Tip: Brake fluid absorbs moisture over time and becomes less
effective. Replace brake fluid every one to two years and your
brakes will preform the best they can.
Motorcycle brakes are an art by themselves! Modern bike brakes
have just an amazing stopping power, well beyond that of what the
regular rider will encounter while riding.
Motorcycles have up to two brake fluid reservoirs, one for the
front, usually found on the handlebars and one for the back. Both
should be checked regularly. Topping up should only be done from a
new, sealed bottle as brake fluid tends to absorb moisture over
time. If your brake pads are thin and due for replacement. Beware -
brake fluid, if spilt on paintwork eats right through to the bare
metal.
Also check the thickness of the brake pads. If you allow them to
go right down to the metal your brake disc will be damaged resulting
in an unnecessary and expensive replacement. Fitting braided steel
brake lines will increase the performance of your brakes by roughly
50%
The Parts
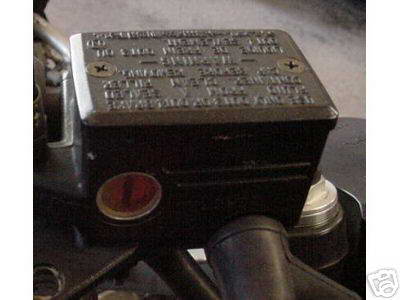
Typical Motorcycle Master Brake Cylinder with Fluid Window.
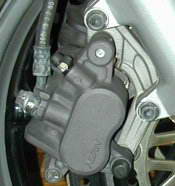
Typical Motorcycle Front Brake Caliper
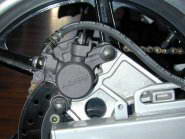
Typical Motorcycle Rear Brake Caliper
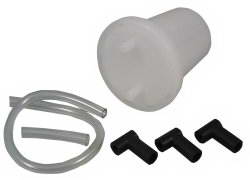
Typical Cheap Brake Bleeding Kit
Deluxe Brake Bleeding Kit
Fitting braided steel brake lines will increase
the performance of your brakes by roughly 50%
Replacing front and rear brake pads
Tip: If you are unsure how to replace brake pads then have a
mechanic do it for you. It is worth the cost as it is in the best
intrests of your safety. Feel free to bleed your own brakes as that
is a easy operation to do.
Replacing stock or worn brake pads is the quickest way to get
increased braking power out of a tired system. Various manufacturers
make all kinds of different types of replacement brake pads for
today's motorcycles. Some claim to last longer, while others claim
to give more feel and braking power. However, be forewarned that the
manufacturer of your motorcycle put a lot of time and effort into
developing your braking system, and there is no telling what a
different type of pad material might do to your rotors or how well
different pads will work with the overall design and setup of your
bike. If you have any doubts, then stick with genuine factory parts.
Removing the calipers from the rotors is the first step in checking
your brake pads. In dealing with your front disc brakes, first
remove the Front Caliper two main bolts that attach the calipers to
the forks. Once the calipers are free you can slide them off of the
brake discs and inspect the amount of pad material and look for
anything out of the ordinary. If there is less than 1/8 inches of
pad thickness left then they should be replaced.
Internals of Front Caliper
Once the calipers are free from their mounting locations, it is time
to disassemble them and remove the brake pads. On this particular
setup there is one threaded metal pin that holds one side of the
pads in place. The other side of the pad rests in the casting of the
brake caliper. Removing this pin will free the pads and they should
just fall right out. Notice the metal clips inside the caliper just
beneath where the pads sit. These metal clips provide pressure on
the pads to keep them from moving around inside the caliper. It is a
good idea when you are working on your brakes to replace these
clips. It would be foolish if you spent all this time and effort to
have something so simple and cheap screw things up.
Internals of Rear Caliper
Once the two mounting bolts have been removed, the caliper should
easily slide off the rotor. Inspection of the pads is the same as
the fronts. The rear pads are smaller because less braking power is
required. The rear pads are held in place by one bolt on one side of
the caliper and are held at the other end inside the casting of the
mounting bracket that the caliper is bolted to. Be very careful to
make sure the new pads are firmly mounted in the caliper and are
held securely at both mounting locations. If there is any doubt,
check them again! Otherwise, they could fall out while you are
cruising down the side of your favorite canyon road and ruin a
perfect day, causing you to crash into the guard rail and go flying
off the side of a cliff. Not a pretty site.
Once the new pads have been assembled into the calipers and
everything is torqued to spec, it is time to bleed the lines.
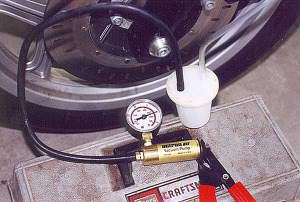
How to Bleed Motorcycle Brakes
Tip: Any brake bleeding kit will do just fine but make sure
you have a small bucket to put the tiny brake bleeder fluid
container in as it is very likely to overflow.
It is actually not very hard to bleed (renew) your own motorcycle
brake fluid. This should be done at least every 2 years. Or when the
brake fluid turns from clear to a brown to black colour (darker it
is, the worse it is).
Brake fluid will eat away at plastic and paint, be sure to cover
any paint or plastic that may get splashed with brake fluid. Wipe
any spilled fluid with the rag and lots of water.
Step 1: Make sure you have the tools to bleed your brake fluid.
The tools you require will vary, but generally this is what you will
need:
A. Wrench/Spanner (average 10mm)
B. Brake bleeding kit (rubber fitting, clear hose, small container)
C. Brake fluid overflow container (to put the brake bleeding kit
small container in)
D. Rags
E. Brake Fluid (check what type of brake fluid you need for your
bike. e.g. DOT 3). Make sure to buy enough brake fluid in the DOT
type you require. (500ml should be more than enough).
Step 2: Attach the brake bleeding kit to the brake fluid nipple
located on the brake caliper.
Step 3: Loosen the nipple so the fluid is free to flow down the
brake bleeding kit tube and into the small container
Step 4: Remove the master cylinder cap (top) so you can monitor
and refill more brake fluid into the master cylinder as you bleed
the brakes.
Step 5. Pump the brake lever so the old/new brake fluid is forced
through the tube into the brake bleeding kit fluid container
Step 6: Keep the volume of the master cylinder constant (near
full) as to not have it empty. Keep pumping on the brake lever until
the fluid coming out is clear (rather than the old brown/black
colour).
Step 7: Once all the tiny air bubbles are gone hold pressure on
the brake level and re-tighten the brake fluid nipple to close it
off.
Step 8: Replace the master cylinder top cover.
Step 9: Remove the brake bleeding kit from the cliper and use the
rag with water to clean up any spillage.
Drum Brakes
For a long time motorcycles were stopped by drum brakes which
work by pushing shoes up against the inside of a drum and cause
friction slowing the motorcycle down. Drum brakes are easy to
recognize with the ‘drum’ mounted on the wheel.
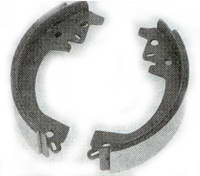
Brake Shoes
Drum brakes worked well and are still being used for smaller
bikes however drums are prone to overheating and wear-outs. Even the
high performance ones, these motorcycle brakes need regular
adjustment for optimal use. Disc brakes started to appear in the
seventies with Honda leading the pack (the CB750). A disc brake
works on a simple principle that a steel disc is gripped by two pads
by a hydraulic calliper.
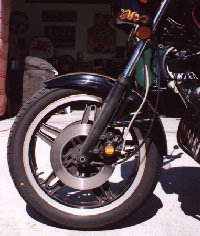
Disk Brakes
Disk brakes are much friendlier for a motorcycle rider, less
prone to overheating and require little (or no) adjustment. The
downside was/is (especial during the early days) that wet weather
didn’t let these motorcycle brakes function as well. Modern day
bikes use twin front disc’s and only one at the rear. Using more
brake power at the back would lead to wheel block ups due to the
dynamics of braking.
Brake Disk or Rotor
Each disk is gripped by calipees, where every calipees is pushed
by four or six pistons. This highly improves the brake power and the
riders feel when braking. Many tour bikes use a combination of
different motorcycle brake hydraulics to divide the front and back
breaking power in the most optimal way. Additionally some bikes now
also have ABS (anti block system).
The steel disk floats in the wheel so it can accommodate the
temperature influences which a cure while braking. The pads are also
fitted loosely in the clamp around the steel disk. Over time the
disk pads need replacing which is just standard maintenance. However
keep an eye on disk damage due to incorrect placement of brake pads
or anything else. Damaging the steel disk can result in a costly
replacement.
|